Binary Sensor
Binary sensors are similar to other sensors in that they monitor the states and conditions of different entities. Where binary sensors differ is they can only return one of two mutually exclusive values. For example, a binary sensor for a window may report a value of open or closed , a switch on or off , a condition true or false .
This either/or constraint is what makes these sensors binary. They are digital in nature, whereas analog sensors, like temperature and weight sensors, return a range of values.
Some binary sensors are created automatically when you add a device integration. For example, adding the ecobee integration will create a binary sensor to detect room occupancy. Other binary sensors can be created manually using the template integration or using an input boolean helper,
Device Class
Knowing a sensor is binary impacts how the sensor’s current state may be represented in Home Assistant’s UI (see Lovelace). Opposing states may be given different icons, colors, and value labels to highlight a particular state over the other. This is set by the binary sensor’s device class.
Here are a few examples of this representation in the UI:
Example of various device classes icons in `on` and `off` state. The on image in this example has `state_color: true` specified in the Entities card configuration to receive the icon coloring.
The full list of supported binary sensor device classes is below (note: these may also be modified in the customizing section).
- None: Generic on/off. This is the default and doesn’t need to be set.
- battery: on means low, off means normal
- battery_charging: on means charging, off means not charging
- cold: on means cold, off means normal
- connectivity: on means connected, off means disconnected
- door: on means open, off means closed
- garage_door: on means open, off means closed
- gas: on means gas detected, off means no gas (clear)
- heat: on means hot, off means normal
- light: on means light detected, off means no light
- lock: on means open (unlocked), off means closed (locked)
- moisture: on means moisture detected (wet), off means no moisture (dry)
- motion: on means motion detected, off means no motion (clear)
- moving: on means moving, off means not moving (stopped)
- occupancy: on means occupied, off means not occupied (clear)
- opening: on means open, off means closed
- plug: on means device is plugged in, off means device is unplugged
- power: on means power detected, off means no power
- presence: on means home, off means away
- problem: on means problem detected, off means no problem (OK)
- running: on means running, off means not running
- safety: on means unsafe, off means safe
- smoke: on means smoke detected, off means no smoke (clear)
- sound: on means sound detected, off means no sound (clear)
- tamper: on means tampering detected, off means no tampering (clear)
- update: on means update available, off means up-to-date
- vibration: on means vibration detected, off means no vibration (clear)
- window: on means open, off means closed
For comparison, here are the device classes for analog sensors.
Источник
Template сенсор в Home Assistant
Иногда появлятеся необходимость создать в Home Assistant новый сенсор значение которого — это что-то расчетное. Например, может понадобиться создать сенсор значение которого — это атрибут другого сенсора или результат какой-то математическкой операции. Для это существует специальный инструмент — template сенсор — шаблонный сенсор.
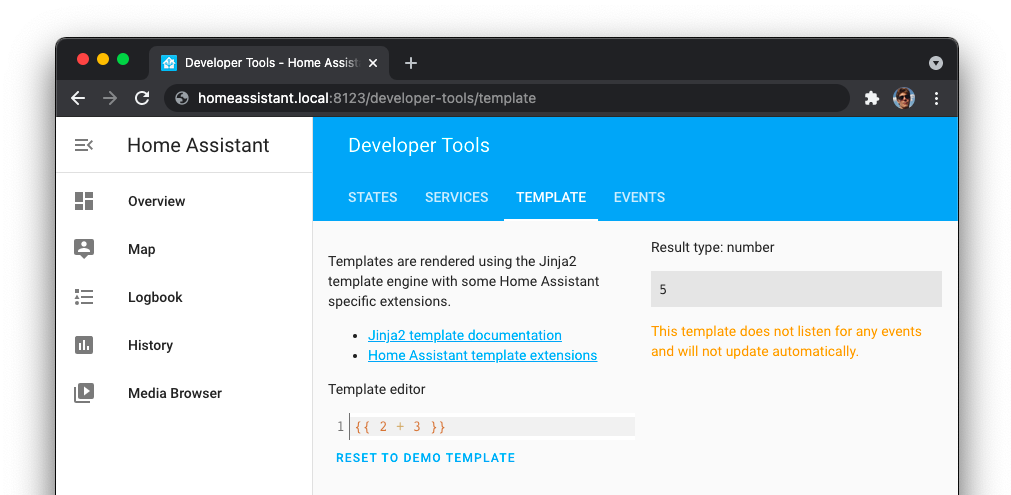
В Home Assistant активно используется инструмент для работы с шаблонами который называется Jinja2. Это не собственная разрабтка Home Assistant, это весьма привычная вещь для языка программирования питон. Jinja2 — достаточно большой и сложный инструмент, но в двух словах — нужно записывать выражение внутри фигурных скобок, вот пример:
Результат этого шаблона — это число 5.
Перед тем как использовать шаблон в template сенсоре очень удобно его протестировать в специальном инструменете которые есть в Home Assistant. Он находится по адресу homeassistant.local:8123/developer-tools/template
Дополнительная информация про использование шаблонов есть в этой статье.
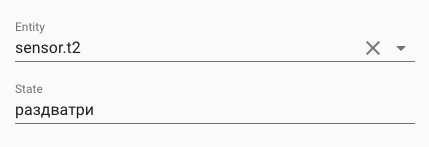
Создать сенсор со значением атрибута
У меня есть zigbee розетка BlitzWolf BW-SHP13. Она подключена в Home Assistant с помощью zigbee2mqtt. В Home Assistant автоматически появляется несколько разных сенсоров, например sensor.0x842e14fffe1393a2_power Вот как выглядит этот сенсор в инструменте проверки состояния:
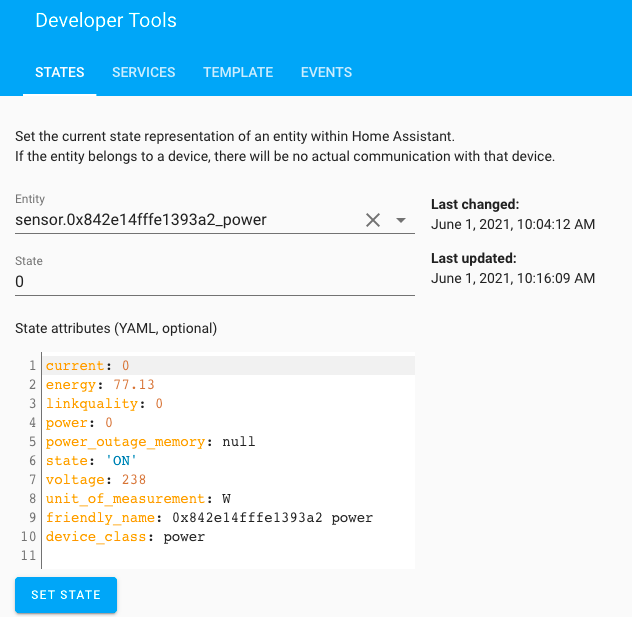
Есть статус (в данный момент — это число 0), и куча разных атрибутов. Я хочу создать отдельный сенсор, значение которого — это значение атрибута energy. Для этого нужно написать вот такой конфиг:
После перезпуска Home Assistant повяляется новый сенсор — sensor.total_energy_pump, значение которого 77.13 — то же самое число которе содержится в атрибуте energy.
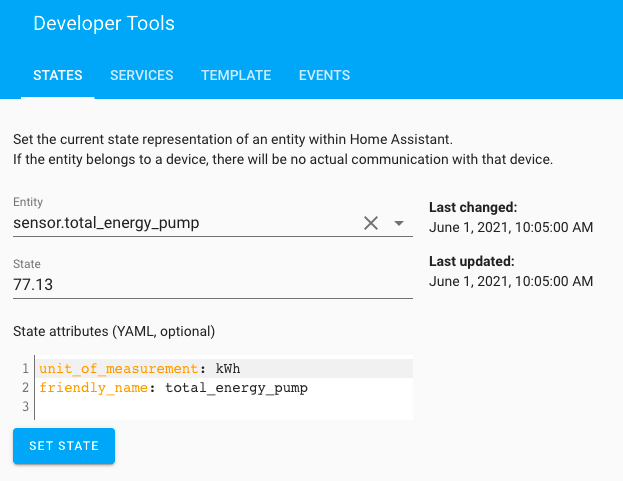
Как только меняется атрибут energy у сенсора sensor.0x842e14fffe1393a2_power значение нового сенсора автоматически меняется.
Рассчет абсолютной влажности
Вот пример создания сенсора который рассчитывает абсолюную влажность в ванной. Этот сенсор использует значения с двух сенсоров (у меня эти данные отдает Aqara climate sensor):
- sensor.0x00158d0004605ef0_humidity — данные про относительную влажность в ванной
- sensor.0x00158d0004605ef0_temperature — данные про температуру в ванной
Перевести значение кВтч в рубли
Если у вас есть сенсор в котором содержится данные про то сколько было израсходовано кВтч за сегодня (например, с помощью utility_meter, то можно посчитать сколько это стоит в рублях с помощью следующих сенсоров.
При использовании однотарифного учета:
При использовании двухтарифного учета:
Создание template сенсора с атрибутами
Можно создать сенсор и управлять не только содержимым стейта, но и тем что содержится в атрибутах. Вот пример:
Использование кавычек и других символов
Шаблон записывается в поле value_template. Обычно когда шаблон помещается в одну строчку, то он записывается в кавычках:
Но если шаблон состоит из нескольких строк, то удобнее его записывать с помощью других символов. Очень часто используется вариант >-
Разница между этими вариантами — это то как происходит работа с пробельными символами. Подрбности есть на сайте https://yaml-multiline.info.
Новый синтаксис
В 2021 году в Home Assistant появился новый синтаксис для описания template сенсоров, вот пример:
У этого способа описания есть большой недостаток — он не работает при использовании в packages.
Про это постоянно пишут тикета на GitHub (например, вот пример тикета), но разработчки HA говорят что это не баг, а так и задуманно и похоже что не собираются это исправлять.
У меня есть большие сомнения что нужно использовать новый синтаксис.
Источник
Полезные сенсоры для Home Assistant
На этой странице собираю разлчиные сенсоры для Home Assistant, которые иногда могут быть полезны. Совершенно не факт что все эти сенсоры нужны всем. Вы сами смотрите что вам может пригодиться и подключайте в Home Assistant только то что действительно надо.
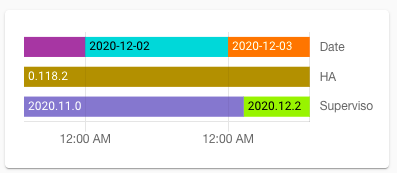
Версия Home Assistant
Создает сенсор sensor.ha_version
Значение этого сенсора это версия Home Assistant, которая установлена. Например «0.118.2»
Версия Supervisor
Значение этого сенсора это версия супервизора, которая установлена. Например «2020.12.2».
(Код сенсора базируется на коде с форума Home Assistant https://community.home-assistant.io/t/sensor-for-version-supervisor-dns-audio/183422/9 )
Супервизор обновляется сам. Не существует штатной возможности отключить автоматическое обновление супервизора. Чаще всего изменения супервизора никак не влияют на то как работает система, но иногда супервизор приносит что-то новое.
Бывает полезно написать автоматизацию, которая отправляет сообщение в телеграм про обновление версии супервизора:

Еще бывает удобно вывести в интерфейс график с визуализацией когда менялись версии:
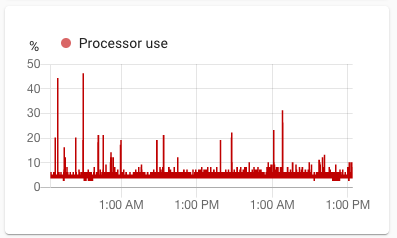
Загрузка процессора
Температура процессора на Raspberry Pi

На Raspberry Pi эта температура всегда должна быть меньше 60 градусов. Если у вас температура больше, то нужно устанавливать более качественный корпус и вентилятор. Вот пример корпуса который весь один большой радиатор.
Троттлинг Raspberry Pi
Этот сенсор показывает состояние троттлинга на Raspberry Pi. Если значение сенсора число 0 — это значит все хорошо, троттлинга нет. Если же значение сенсора это какое-то другое число — это значит компьютеру плохо и включается троттлинг. Плохо компьютеру может быть от двух причин: либо он перегрелся, либо недостаточно питания.
Источник
Template Binary Sensor
The template platform supports sensors which breaks out the state and state_attributes from other entities. The state of a Template Binary Sensor can only be on or off .
To enable Template Binary Sensors in your installation, add the following to your configuration.yaml file:
Configuration Variables
( map ) (Required) List of your sensors.
( string ) (Optional) Name to use in the frontend.
( string | list ) (Optional) Add a list of entity IDs so the sensor only reacts to state changes of these entities. This will reduce the number of times the sensor will try to update its state.
( device_class ) (Optional) The type/class of the sensor to set the icon in the frontend.
( template ) (Required) Defines a template to set the state of the sensor.
( time ) (Optional) The amount of time the template state must be met before this sensor will switch to on .
( time ) (Optional) The amount of time the template state must be not met before this sensor will switch to off .
Considerations
If you are using the state of a platform that takes extra time to load, the Template Binary Sensor may get an unknown state during startup. This results in error messages in your log file until that platform has completed loading. If you use is_state() function in your template, you can avoid this situation. For example, you would replace < < states.switch.source.state == 'on' >> with this equivalent that returns true / false and never gives an unknown result: < < is_state('switch.source', 'on') >>
Examples
In this section you find some real life examples of how to use this sensor.
Sensor Threshold
This example indicates true if a sensor is above a given threshold. Assuming a sensor of furnace that provides a current reading for the fan motor, we can determine if the furnace is running by checking that it is over some threshold:
Switch as Sensor
Some movement sensors and door/window sensors will appear as a switch. By using a Template Binary Sensor, the switch can be displayed as a binary sensors. The original switch can then be hidden by customizing.
Combining Multiple Sensors, and Using entity_id
This example combines multiple CO sensors into a single overall status. When using templates with binary sensors, you need to return true or false explicitly. entity_id is used to limit which sensors are being monitored to update the state, making computing this sensor far more efficient.
Washing Machine Running
This example creates a washing machine “load running” sensor by monitoring an energy meter connected to the washer. During the washer’s operation, the energy meter will fluctuate wildly, hitting zero frequently even before the load is finished. By utilizing off_delay , we can have this sensor only turn off if there has been no washer activity for 5 minutes.
Is Anyone Home?
This example is determining if anyone is home based on the combination of device tracking and motion sensors. It’s extremely useful if you have kids/baby sitter/grand parents who might still be in your house that aren’t represented by a trackable device in home assistant. This is providing a composite of WiFi based device tracking and Z-Wave multisensor presence sensors.
Источник
Xiaomi Binary Sensor
The xiaomi aqara binary sensor platform allows you to get data from your Xiaomi binary sensors.
The requirement is that you have setup the xiaomi aqara integration.
Type of sensors supported
| Name | Zigbee entity | Model no. | States | Event | Event key | Event values |
|---|---|---|---|---|---|---|
| Motion Sensor (1st gen) | motion | RTCGQ01LM | on, off | xiaomi_aqara.motion | ||
| Motion Sensor (2nd gen) | sensor_motion.aq2 | RTCGQ11LM | on, off | xiaomi_aqara.motion | ||
| Xiaomi Door and Window Sensor (1st gen) | magnet | MCCGQ01LM | on, off | |||
| Aqara Door and Window Sensor (2nd gen) | sensor_magnet.aq2 | MCCGQ11LM | on, off | |||
| Smoke Detector | smoke | JTYJ-GD-01LM/BW | on, off | |||
| Gas Leak Detector | natgas | JTQJ-BF-01LM/BW | on, off | |||
| Water Leak Sensor | sensor_wleak.aq1 | SJCGQ11LM | on, off | |||
| Button (1st gen) | switch | WXKG01LM | on (through long_click_press), off | xiaomi_aqara.click | click_type | long_click_press , hold , single , double |
| Button (2nd gen) | sensor_switch.aq2, remote.b1acn01 | WXKG11LM | on (through long_click_press), off | xiaomi_aqara.click | click_type | single , double , long_click_press , hold |
| Button (2nd gen, model b) | sensor_switch.aq3 | WXKG12LM | off (always) | xiaomi_aqara.click | click_type | single , double , long_click_press , shake |
| Aqara Wireless Switch (Single) | 86sw1 | WXKG03LM | off (always) | xiaomi_aqara.click | click_type | single |
| Aqara Wireless Switch (Double) | 86sw2 | WXKG02LM | off (always) | xiaomi_aqara.click | click_type | single , both |
| Aqara Wireless Switch (Single) (2nd gen) | remote.b186acn01 | WXKG03LM | off (always) | xiaomi_aqara.click | click_type | single , double , long |
| Aqara Wireless Switch (Double) (2nd gen) | remote.b286acn01 | WXKG02LM | off (always) | xiaomi_aqara.click | click_type | single , double , long , both , double_both , long_both |
| Cube | cube | MFKZQ01LM | off (always) | xiaomi_aqara.cube_action | action_type , action_value (rotate) | flip90 , flip180 , move , tap_twice , shake_air , swing , alert , free_fall , rotate (degrees at action_value) |
| Vibration Sensor | vibration | DJT11LM | off (always) | xiaomi_aqara.movement | movement_type | vibrate , tilt , free_fall |
Automation examples
Motion
Door and/or Window
Smoke
Xiaomi Wireless Button
As indicated in the table on top of this page there are 3 versions of the button. For the round shaped button the available events are single , double , hold , long_click_press and long_click_release . Aqara branded buttons are square shaped. Model WXKG11LM only supports single , double , long_click_press and hold events. WXKG12LM supports single , double , long_click_press and shake events. For the Aqara versions the delay between two clicks to generate a double click must be larger than with the round button. Clicking too quickly generates a single click event.
Xiaomi Cube
Available events are flip90 , flip180 , move , tap_twice , shake_air , swing , alert , free_fall and rotate . The integration stores the last action as the attribute last_action .
Aqara Wireless Switch
The Aqara Wireless Switch is available as single-key and double-key version. Each key behaves like the Wireless Button limited to the click event single . The double key version adds a third device called binary_sensor.wall_switch_both_158xxxxxxxxx12 which reports a click event called both if both keys are pressed.
Vibration Sensor
This automation toggles the living room lamp on vibration/tilt.
Источник